If you’re a developer and just want the code, you can skip this introduction
If you’re looking for a quick solution, try this plugin Advanced Rich Text Tools
Since 2010, I’ve spent a large amount of time developing a framework for building WordPress websites. Generally the development has been two-pronged, with client requests being the biggest contributor. Things like Facebook likes, Twitter feeds and an early YouTube embed system.
The second ‘prong’ has been a desire to make some things easier for clients to edit. After all, when it comes to design, I’m happy to go into text-edit mode and code in div’s and custom CSS calls, but I don’t expect clients to do the same.
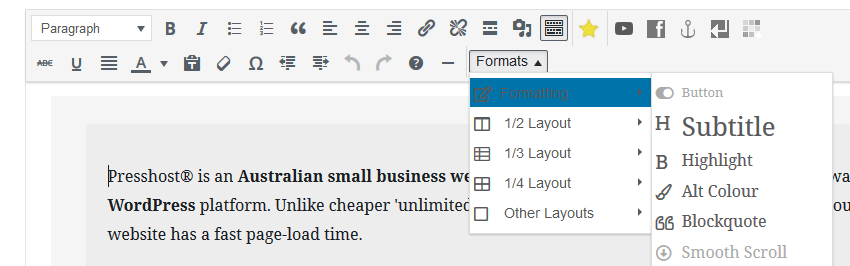
Within the framework, the ability to format certain parts of the page were included to make colour changes and columns easier for people to create.
When Gutenberg was released with WordPress 5, the temptation for me was to stick with the classic editor which I was very comfortable with, however as a WordPress developer, it is important to embrace new changes and, while I had some issues with the editor when I first started, I have found that the benefits far outweigh Gutenberg’s current limitations.
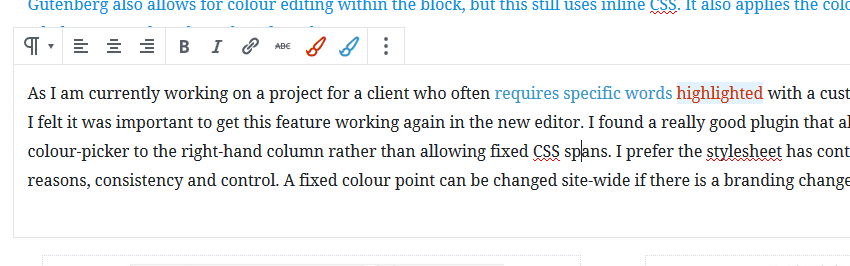
One of the features that I’d added into the framework was the ability for clients to select custom colours for portions of their content. The old editor already had a feature that allowed people to do this, but it used inline font tags rather than a direct CSS call. Creating a span with a call allowed for better consistency and compliance with coding standards. Gutenberg also allows for colour editing within the block, but this still uses inline CSS. It also applies the colour to the whole paragraph and not the selected text.

As I am currently working on a project for a client who often requires specific words highlighted with a custom colour, I felt it was important to get this feature working again in the new editor. I found a really good plugin that allowed me to do this, however it added the colour-picker to the right-hand column rather than allowing fixed CSS spans. I prefer the stylesheet has control over the choice of colours for two reasons, consistency and control. A fixed colour point can be changed site-wide if there is a branding change or a template rebuild.
Normally with WordPress there is no lack of articles and examples when it comes to developing pretty much anything, but it seems that Gutenberg customisation articles are lacking, most likely due to the newness of the editor; I’m writing this in part to redress that.
This was also a bit of a learning curve because I’m a lot more comfortable with writing PHP than JavaScript, and Gutenberg is predominately the latter. The examples on this page will be available in the upcoming framework release version 3.3.
PHP
I use a span with two colour classes within the framework, so the examples will be based on these, just modify them as needed.
.highlight
.alt-colour
Firstly, enqueue the JavaScript and the CSS files in your functions.php file, pointing to the location of your new CSS and JavaScript files.
// JavaScript
function seja_gutenberg() {
    wp_enqueue_script(
        'seja-gutenscript',
        get_template_directory_uri() . '/js/seja-gutenberg.js',
        array(
		'wp-element',
		'wp-rich-text',
		'wp-format-library',
	)
    );
}
add_action( 'enqueue_block_editor_assets', 'seja_gutenberg' );

// CSS
function seja_gutenberg_styles() {
	wp_enqueue_style(
		'seja_gutenberg',
		get_template_directory_uri() . '/css/gutenberg.css',
		false,
		'3.3',
		'all'
	);
}
add_action( 'enqueue_block_editor_assets', 'seja_gutenberg_styles' );
My version is built into the theme, if you’re building a plugin you would need to enqueue the scripts differently. The following is based on the example in the Gutenberg Handbook.
function seja_gutenberg() {
    wp_enqueue_script(
        'myguten-script',
        plugins_url( 'js/seja-gutenberg.js', __FILE__ ),
        array( 'wp-element', 'wp-rich-text', 'wp-format-library' ),
        filemtime( plugin_dir_path( __FILE__ ) . '/js/seja-gutenberg.js' )
    );
}
add_action( 'enqueue_block_editor_assets', 'seja_gutenberg' );
JavaScript
The JavaScript is a derivative of the Advanced Rich Text Tools plugin. In my live version I’ve commented out the Subscript and Superscript variables from the array.
'use strict';

var _window$wp$element = window.wp.element;
var createElement = _window$wp$element.createElement;
var Fragment = _window$wp$element.Fragment;
var _window$wp$richText = window.wp.richText;
var registerFormatType = _window$wp$richText.registerFormatType;
var toggleFormat = _window$wp$richText.toggleFormat;
var _window$wp$editor = window.wp.editor;
var RichTextToolbarButton = _window$wp$editor.RichTextToolbarButton;
var RichTextShortcut = _window$wp$editor.RichTextShortcut;


[{
	/*
  name: 'sup',
  tag: 'sup',
  title: 'Superscript',
  character: '.'
}, {
  name: 'sub',
  tag: 'sub',
  title: 'Subscript',
  character: ','
}, { */
  name: 'highlight',
  tag: 'span',
  title: 'Highlight',
  character: '1'
}, {
  name: 'alt-colour',
  tag: 'span',
  title: 'Alt-Colour',
  character: '2'
}].forEach(function (_ref) {
  var name = _ref.name;
  var tag = _ref.tag;
  var title = _ref.title;
  var character = _ref.character;
  var icon = _ref.icon;

  var type = 'advanced/' + name;

  registerFormatType(type, {
    title: title,
    tagName: tag,
    className: name,
    edit: function edit(_ref2) {
      var isActive = _ref2.isActive;
      var value = _ref2.value;
      var onChange = _ref2.onChange;

      var onToggle = function onToggle() {
        return onChange(toggleFormat(value, { type: type }));
      };

      return createElement(Fragment, null, createElement(RichTextShortcut, {
        type: 'primary',
        character: character,
        onUse: onToggle
      }), createElement(RichTextToolbarButton, {
        title: title,
        onClick: onToggle,
        isActive: isActive,
        shortcutType: 'primary',
        shortcutCharacter: character,
        className: 'toolbar-button-with-text toolbar-button__advanced-' + name
      }));
    }
  });
});
For simplicity I’ve kept the CSS class name the same as the name of the button, however there may be occasions where you need to duplicate a class name (perhaps for a span and an anchor). It is possible to add additional elements into the array, and then include the variable call after.
CSS
Adding CSS to the admin to style the buttons and also the text colour
/* text Colours */
.highlight{
	color:#c30;
}
.alt-colour{
	color:#39c;
}
/* toolbar */
.toolbar-button-with-text:before {
	display: block;
	top: 3px;
	bottom: 3px;
	left: 3px;
	right: 3px;
	position: absolute;
	text-align: center;
	font-size: 20px;
	font-weight: 500;
	line-height: 30px;
	border-radius: 4px;
}
.toolbar-button-with-text:hover:before,
.toolbar-button-with-text:focus:before {
	box-shadow: inset 0 0 0 1px #555d66, inset 0 0 0 2px #fff;
	color: #555d66;
}
.toolbar-button-with-text.is-active:before {
	background: #555d66;
	color: #fff;
}
.toolbar-button__advanced-sup:before {
	content: 'x²';
}
.toolbar-button__advanced-sub:before {
	content: 'x₂';
}
.toolbar-button__advanced-highlight:before {
	font-family: 'Font Awesome 5 Pro';
	content: "\f1fc";
	color:#c30;
}
.toolbar-button__advanced-alt-colour:before {
	font-family: 'Font Awesome 5 Pro';
	content: "\f1fc";
	color:#39c;
}
A footnote here: I use a licensed copy of Font Awesome, however you can download Font Awesome for Free and change the font-family call
font-family: 'Font Awesome 5 Free'Sources and Resources
Advanced Rich Text Tools Plugin
The ES6 source code that I worked from is on a Github page here
ES6 Compiler
Gutenberg Handbook – Registering Blocks