The amount of work needed to build even a basic website theme in WordPress is quite large, but as most sites require similar things they all start in much the same way.
This website is built by our partnership business Seja Design and utilises their framework. A ready-built WordPress theme is often not suitable as they can be very generic and may not customise well; this is where using the framework helps.
For all intents and purposes, the site is custom built, but the scaffolding needed to build the site is already in place, we just add in the graphical elements.
Posted inframework|Comments Off on What is a framework
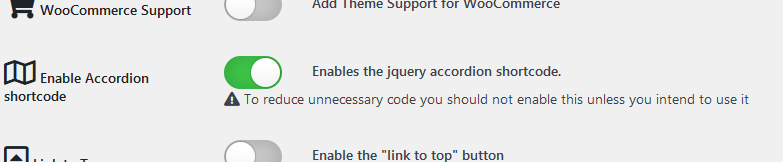
The Seja Framework supports accordion pages. These pages are great for displaying a large amount of content where sections can be hidden.
A great example of where this is useful is a Frequently Asked Questions list, where readers only want to see the content that is relevant to them.
Demonstrating the Accordion
The Accordion utilises the jQuery Accordion Widget and is implemented using shortcode to frame the content in an HTML description list. Shortcode in WordPress is a piece of text wrapped in square brackets designed to implement something more complicated. Contact forms and shopping carts are an example of shortcode in WordPress.
The accordion requires the use of wrap-around shortcode tags in a minimum of two blocks. For each additional accordion section, an extra shortcode block is required.
It is important that the first and last blocks are marked as such to allow the correct formatting. We’ll demonstrate using this page’s markup as an example.
The title attribute within the shortcode creates the h3 descriptor tag
The following example demonstrates the opening of an accordion block, showing the title, the class (which here defines the first accordion block) and an optional name but to make the sections work correctly we will create some “wrap-around” shortcode.
[accordion title="Demonstrating the Accordion" class="first"]
What is wrap around shortcode?
Simple shortcode (such as the contact form implementation) is contained within a single set of square brackets, however it is also possible to pass additional content, including line breaks and header tags by wrapping between an opening and a closing shortcode block.
The following is an example of this content wrapped by shortcode.
In the Accordion shortcode, this wrapped content is the block of text that is revealed when the title is clicked on.
Important: There is a single character space between the bracket and the forward slash in the closing accordion shortcode tag in all these examples due to the WordPress rendering engine. If you are copy/pasting these examples you WILL need to remove this space
[accordion title="Demonstrating the Accordion" class="first" name="accordion-example"] The content is included after the shortcode, which is then wrapped using a closing tag (similar to a html closing tag). [ /accordion]
Implementing the shortcode
To create an accordion section, a bare minimum of two accordion sections will be needed, and these will need to be marked as ‘first’ and ‘last’. For space and ease of reading, the wrapped content has been removed in all examples
title: The text that sits in the top section class: default is ‘block’ however it’s important to use ‘first’ for the first block and ‘last’ for the final block. The back-end code that powers this feature requires these two classes to correctly render the HTML.
You can generate as many accordion blocks as you require, but only the first and the last blocks require identifying by the class option. The accordion shortcode layout for this page looks like this
[accordion title="Demonstrating the Accordion" class="first" name="accordion-example"] content [ /accordion]
[accordion title="What is 'wrap-around' shortcode?"] content [ /accordion]
[accordion title="Implementing the shortcode"] content [ /accordion]
[accordion title="Understanding the HTML"] content [ /accordion]
[accordion title="Not Working?" class="last"] content [ /accordion]
An optional ‘titleclass‘ exists if you require custom formatting. This is added to the <h3> tag.
While it is not necessary for you to understand the HTML, we have included the markup as a reference point. Based on the shortcode from the previous section the outputted HTML would appear as follows;
<div id="accordion">
   <h3>Demonstrating the Accordion</h3>
   <div class="first">Content</div>

   <h3>What is 'wrap-around' shortcode?</span></h3>
   <div class="block">Content</div>

   <h3>Usage - The Shortcode</span></h3>
   <div class="block">Content</div>

   <h3>Understanding the HTML</span></h3t>
   <div class="block">Content</div>

   <h3 class="example-class">Not Working?</h3>
   <div class="last">Content</div>
</div>
Not Working
Make sure you have correctly implemented the shortcode and enabled the accordion
Version 2 themes
Seja Template > Theme Settings > Theme Content
Version 3 themes
Seja Template > Theme Settings
Posted inWordPress|Comments Off on How to create an Accordion Page using the Seja Framework
Lately, we have seen a number of clients receiving emails regarding ‘Updates to the cPanel Service Agreement’ which are phishing attempts and should be ignored and deleted.
There is an attachment which is a purely JavaScript driven web document. Opening this could potentially open your computer to exploits.
We purchase cPanel licenses for our shared hosting environment and also on behalf of our Virtual Private Server (VPS) customers. As such any licensing agreements are between Presshost as a customer and cPanel as the provider. cPanel will never contact you directly.
An example of this email is below
Email Subject
Redacted domain name. We’re updating our privacy policy and other documents based on GDPR standards
Email body
Redacted domain name. You’re receiving this email because we are updating the cPanel Services Agreement, which applies to one of more cPanel or services you use. We’re making these updates to clarify our terms and ensure that they remain transparent for you, as well as to cover new cPanel services and features.
You can learn more about these updates on our FAQ page including a summary of the most notable changes. If you wish to continue to use our products and services we recommend that you find the attachment file that is attached to this email to automatically update to our privacy policy to avoid service interruption, or your redacted domain name account being closed.
If you do not agree, you can choose to discontinue using the products and services, and close your cPanel account redacted domain name before these terms become effective.
Thank you for using cPanel products and services
Posted incPanel|Comments Off on Phishing Attempt for cPanel accounts
This version focuses on accessibility and included a new navigation structure. The original menu from V3.0 (now called ‘legacy’) is no longer available so you cannot upgrade to this version if this menu is being used. We recommend changing to ‘Seja Three’ as an intermediatory change prior and then switching to ‘Seja Access’ once you have upgraded.
All sites built from 3.6 will be using ‘Seja Access’ as their default menu.
Removed the depreciated 'parallax' content
 Changed the location of 'theme-styles.css' to the theme root
     Framework will look for this stylesheet first, then fall back to the old location
     The existance of this stylesheet will prevent the legacy menu from being activated in the Seja Template panel
 Introduced CSS variables
     --theme-colour will act as the default for H text, bullet points, pagination, blockquotes, et cetera
 the body class now includes 'top-content-block' or 'top-content-block-disabled' to allow additional CSS hooks
 Accessibility compliance
     Created new navigation system 'seja-access'
     Removed legacy navigation
     Added skip to content links
         dynamically linked to #top-content-block or #content accordingly
     Added landmark roles
 Error corrections
     Corrected some Woo calculation errors
Click on File, then in the Account Information window that opens, select the ‘Add Account’ button
Add in your name and your account details and click Next
Manual Setup
If automatic setup fails you can manually add your new email address.
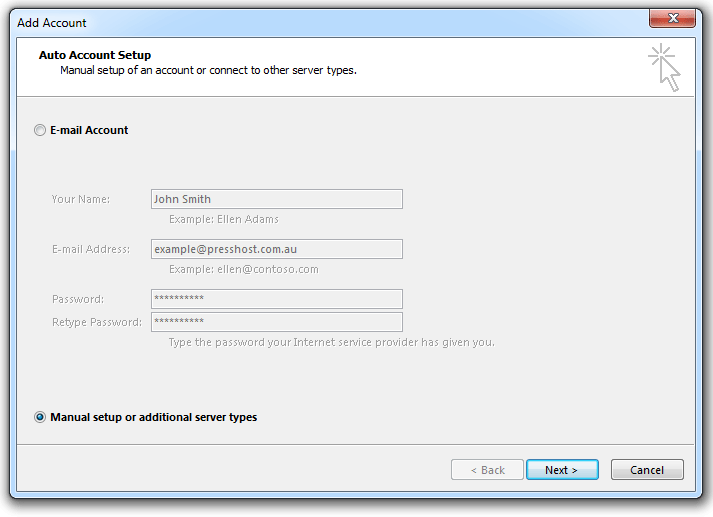
Click on File and ‘Add account‘ as per the Automatic Setup
In the Add Account dialogue window, click on the Manual Setup or additional server types radio button (see image below)
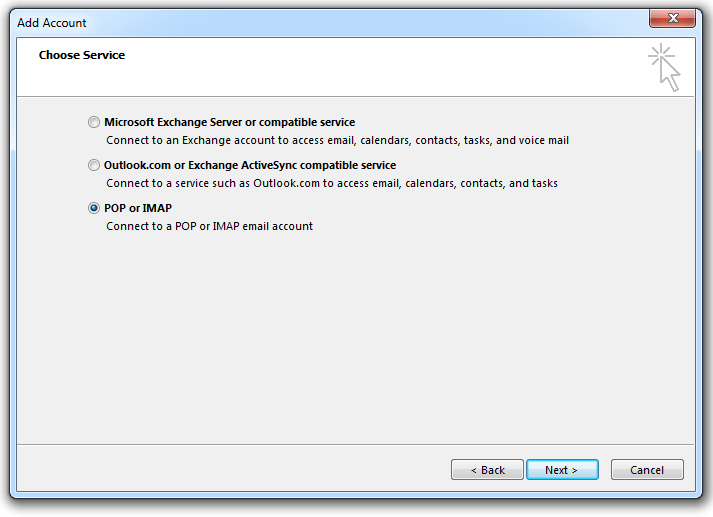
Click the POP or IMAP option
Fill in the User Information (Name and Email Address)
Select IMAP as the Account Type
use mail.yourdomain.com as your Incoming and Outgoing Server (i.e. mail.presshost.com.au)
The Logon Information is your FULL email address and password
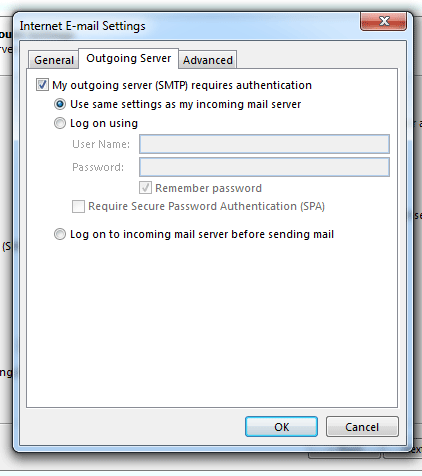
Click on the ‘More Settings…‘ button in the bottom right corner
In the Outgoing Server tab, make sure ‘My outgoing server (SMTP) requires authentication is tickedBy default, Use same settings as my incoming mail server should already be set
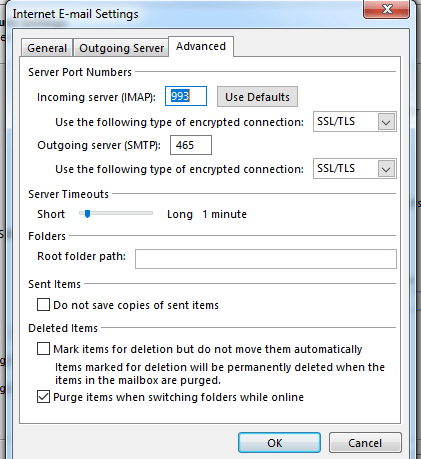
In the Advanced tab, set the ports and encryption to the following –
Incoming IMAP port 993 using SSL/TLS encryption
Outgoing SMTP port 465 (or port 26) using SSL/TLS encryption
Click OK to return to the email and password settings window
Click the Test Account Settings button and you should see all items with green check marks.
Click the Close Button to close the test window.
Click OK to save your settings.
Posted inEmail, Knowledgebase|Comments Off on Setup Email in Outlook 2013 and 2016
Corrected WooCommerce total item count calculation error for null items
 added missing SEJA_PHP_VERSION definition
 Updated Apple Touch and Windows Tile icons
Posted inframework|Comments Off on Framework 3.5.1
This article is for setting up email in older versions of Microsoft Outlook
Automatic Setup
Microsoft Outlook 2007 can automatically detect this email account’s settings.
Choose to set up a new email account in “Microsoft Outlook 2007”.
When prompted for the email address, enter your full email address
Use your email account password as the password.
If the auto-configuration fails, please set up the account using the manual settings by going to Tools > Account Settings
Manual Setup
Click on the Email tab and click on the New… button.
Tick the Manually configure server settings or additional server types and click Next.
Select Internet E-mail option and click Next.
Fill in the following fields: Enter Your Name as you want it to appear. Enter your full email address i.e. test@presshost.net.au (note, this is not an active address) in the Email address: field.
Select IMAP as the account type
Your incoming and outgoing mail server will be mail.yourdomainname.domain (for example mail.presshost.net.au)
Enter your full email address in the Account name field.
Enter your email password in the Password field.
Click on More Settings
In the Outgoing Server tab, make sure ‘My outgoing server (SMTP) requires authentication is ticked
By default, Use same settings as my incoming mail server should already be set
In the Advanced tab, set the ports and encryption to the following –
Incoming IMAP port 993 using SSL encryption
Outgoing SMTP port 465 (or port 26) using TLS encryption
Click OK to return to the email and password settings window
Click the Test Account Settings button and you should see all items with green check marks.
Click the Close Button to close the test window.
Click OK to save your settings.
Posted inEmail|Comments Off on Setup Email in Outlook 2007
This is a major update with focus on back-end structure and improved speed.
Very little has changed from a user perspective, however framework structure has changed, and a lot more jQuery and CSS is embedded into the page dynamically rather than relying on a single all-in-one linked element. The aim is to improve speed and also the Google pagespeed ranking
Changelog
Rebuilding of attached jQuery and CSS files
More dynamic elements built inline
Additional focus on improving page-speed scores
*note: this list of changes may be small but this is a major structural update
If you have registered a domain through Aust Domains, Crazy Domains
or Cheap Domains you will need to adjust your nameservers to complete
the hosting. Nameservers contain DNS information which acts like a map, telling Internet traffic where to go.
IMPORTANT:
If you have externally hosted email, such as an exchange server you
should contact Presshost or your IT support prior to making any changes
to the nameservers
Changing Nameservers
Firstly log into your account. You should have received an email from your domain registrar with details on how to do this
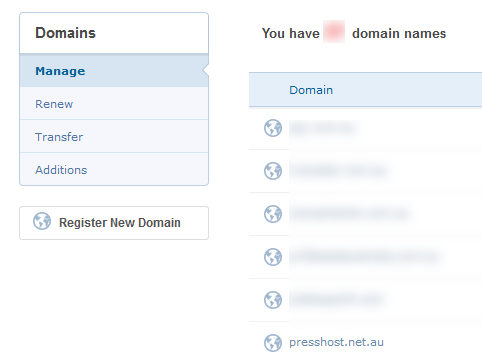
Click on the Domains button in the top left
You will be shown a list of domains you have registered – Select the one you wish to edit
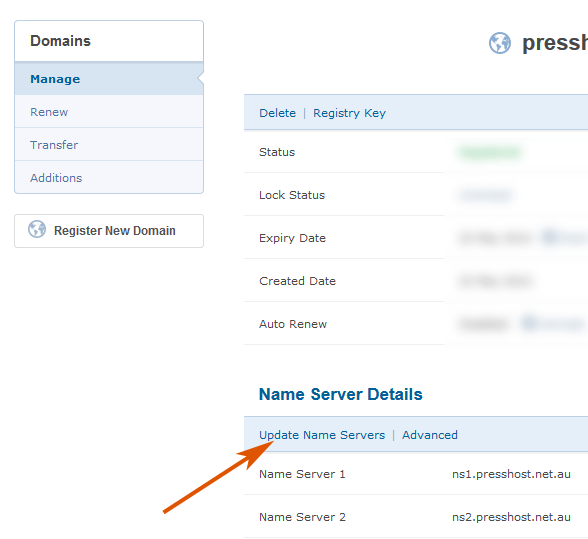
Choose the Update Name Servers option
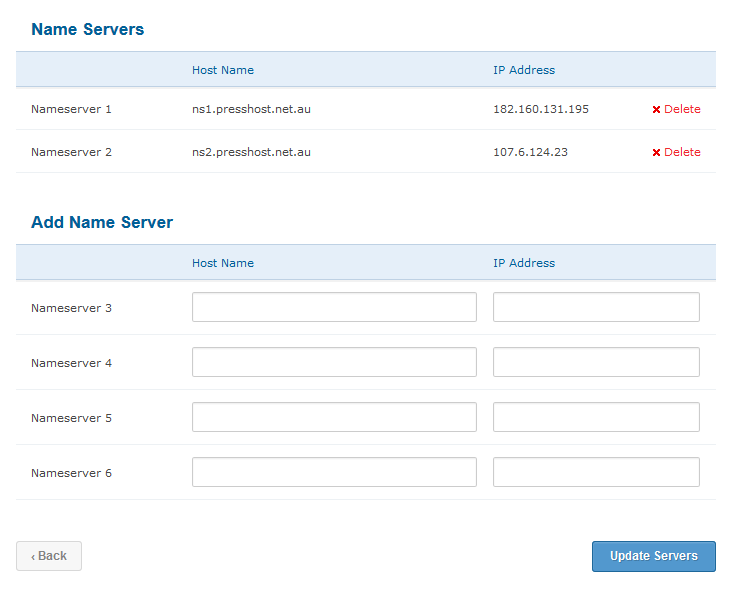
You will now be able to edit the nameservers you have. You should add the new name servers into the available fields in the Add Name Server section. The IP address will be added automatically.
Add the following servers: ns1.presshost.net.au ns2.presshost.net.au ns3.presshost.net.au
We recommend that you click on the fourth available nameserver field to make sure that the second IP address field populates.
Click Update Servers
Now delete the old servers using the red x Delete
Congratulations, your nameservers have been updated
Posted inDNS|Comments Off on Changing Crazy Domains (SYRA) Nameservers